Project : Zimbra HA + Freenas Storage + Proxmox
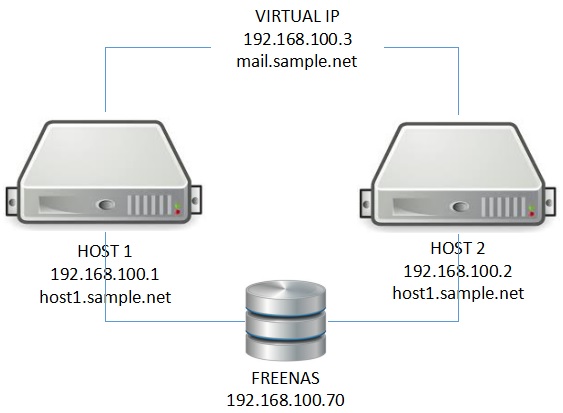
Kali ini saya akan mencoba membuat project Zimbra HA menggunakan 1 storage.
Sebenarnya project ini akan direalisasikan ke Server Hardware.
Tapi untuk testing saya coba untuk install di Proxmox.
OK. Kita mulai.
PROXMOX 4.4
Terdapat 3 VM di proxmox yaitu
1. Host1.sample.net : Centos 7.3 192.168.100.1
2. Host2.sample.net : Centos 7.3 192.168.100.2
3. Freenas : Freenas 9.3 192.168.100.70
Sebagai tambahan untuk daftar IP yaitu Virtual IP mail.sample.net : 192.168.100.3
Disini saya tidak menjelaskan cara instalasi Centos dan Freenas.
FREENAS 9.3
Untuk Freenas saya coba pernah coba versi 10 tetapi tidak bisa share untuk ISCSInya mungkin karena banyak setingan yang belum saya tahu. Karena itu saya memutuskan versi 9.3.
ISCSI dibagi 2 :
1. ISCSI Target (Server Freenas)
2. ISCSI Initiator (Client Centos)
Setup ISCSI
- Masuk ke Menu Sharing - Block Iscsi
- Sub menu Target Global Configuration :
Base Name : iqn.2017-09.com.samplecorp.nas
- Sub menu Portals
Comment : iscsi network
Discovery Auth Methode : none (default)
Discovery Auth Group : none (default)
Portal IP
IP Address : 192.168.100.70
Port : 3260
- Sub menu Initiators
Initiators : iqn.1994-05.com.redhat:137939be31a (disesuaikan dgn host1 /etc/iscsi/initiatorname.iscsi)
iqn.1994-05.com.redhat:137939be31b (disesuaikan dgn host2 /etc/iscsi/initiatorname.iscsi)
Authorized network : ALL
- Sub menu Targets
Target Name : target-100gb
Target Alias : 100GB
ISCSI Group
Portal Group ID : 1 (iscsi network)
Initiators Group ID : 1
Auth Method : None
Authentication Group number : None
- Sub menu Extents
Extent Name : 100gb-extent
Exten Type : File
Serial: 10000003
Path to the extent : /mnt/vd1/ds1/100gb (data sheet yang sudah diseting sebelumnya)
Extent size : 100GB
Logical Block Size : 512
LUN RPM : 7200
- Sub menu Associated Targets
Target : target-100gb
LUN ID: Auto
Extent : 100gb-extent
HOST
Host1 dan host2 menggunakan Centos 7.3. Saya menggunakan versi 7 agar lebih update.
Seting Network di kedua host
1. Set BOOTPRO=none
[root@host1 ~]# vi /etc/sysconfig/network-scripts/ifcfg-eth0
2. Disable Network Manager
[root@host1 ~]# service NetworkManager stop
Redirecting to /bin/systemctl stop NetworkManager.service
[root@host1 ~]# systemctl disable NetworkManager
Removed symlink /etc/systemd/system/multi-user.target.wants/NetworkManager.service
Removed symlink /etc/systemd/system/dbus-org.freedesktop.NetworkManager.service
Removed symlink /etc/systemd/system/dbus-org.freedesktop.nm-dispatcher.service
3. Edit file
[root@host1 ~]# vi /etc/hosts
192.168.100.1 host1.sample.net host1
192.168.100.2 host2.sample.net host2
192.168.100.3 mail.sample.net mail
4. Install NTP
[root@host1 ~]# yum install ntp
[root@host1 ~]# service ntpd start
Redirecting to /bin/systemctl start ntpd.service
[root@host1 ~]# systemctl enable ntpd
Created symlink from /etc/systemd/system/multi-user.target.wants/ntpd.service to /usr/lib/systemd/system/ntpd.service
5. Konfigurasi DNS
[root@host1 ~]# cat /etc/resolv.conf
# Generated by NetworkManager
search sample.net
nameserver 192.168.10.1
6. Install Bind (saya tidak menjelaskan disni)
- Open Firewall
[root@host1 ~]# firewall-cmd --permanent --add-port=53/tcp
[root@host1 ~]# firewall-cmd --permanent --add-port=53/udp
[root@host1 ~]# Firewall-cmd reload
7. Instalasi Iscsi initiator
[root@host1 ~]# yum install iscsi-initiator-utils -y
Cek file
[root@host1 ~]# cat /etc/iscsi/initiatorname.iscsi
InitiatorName=iqn.1994-05.com.redhat:137939be31a
Initiator Name ini diisikan di setingan Freenas di Sub menu Initiators
Cek iscsi
[root@host1 ~]# iscsiadm -m discovery -t sendtargets -p 192.168.100.70
192.168.100.70:3260,257 iqn.2017-11.net.sample.nas:target-100gb
Login iscsi
[root@host1 ~]# iscsiadm -m node -T iqn.2017-11.net.sample.nas:target-100gb --login
Cek disk, akan terdapat partisi baru. Buat partisi dan format disk.
Disni disk di /dev/sdb1 dengan format xfs
Buat direktori mount untuk zimbra
[root@host1 ~]# mkdir /data
CLUSTER
Untuk Cluster HA. Tahapannya.
1. Corosync
2. Pacemaker
3. Setup Cluster
4. Setup Resource
1. Instalasi Corosync
- Firewall
[root@host1 ~]# firewall-cmd --permanent --add-port=5404/udp
success
[root@host1 ~]# firewall-cmd --permanent --add-port=5405/udp
success
[root@host1 ~]# firewall-cmd --reload
success
[root@host1 ~]# yum install corosync -y
[root@host1 ~]# systemctl enable corosync
Created symlink from /etc/systemd/system/multi-user.target.wants/corosync.service to /usr/lib/systemd/system/corosync.service.
[root@host1 ~]# corosync-keygen
Corosync Cluster Engine Authentication key generator.
Gathering 1024 bits for key from /dev/random.
Press keys on your keyboard to generate entropy.
Press keys on your keyboard to generate entropy (bits = 920).
Press keys on your keyboard to generate entropy (bits = 1000).
Writing corosync key to /etc/corosync/authkey.
[root@host1 ~]# cp /etc/corosync/corosync.conf.example /etc/corosync/corosync.conf
Edit file corosync.conf
[root@host1 ~]# cat /etc/corosync/corosync.conf
totem {
version: 2
crypto_cipher: aes256
crypto_hash: sha256
interface {
bindnetaddr: 192.168.100.1
mcastaddr: 239.255.1.1
mcastport: 5405
ttl: 1
}
}
logging {
fileline: off
to_stderr: no
to_logfile: yes
logfile: /var/log/cluster/corosync.log
to_syslog: no
debug: off
timestamp: on
logger_subsys {
subsys: QUORUM
debug: off
}
}
quorum {
provider: corosync_votequorum
}
nodelist {
node {
ring0_addr: 192.168.100.1
nodeid: 1
}
node {
ring0_addr: 192.168.100.2
nodeid: 2
}
}
Copy file corosync.conf dan authkey
[root@host1 ~]# scp /etc/corosync/corosync.conf host2:/etc/corosync/corosync.conf
[root@host1 ~]# scp /etc/corosync/authkey host2:/etc/corosync/authkey
Karena kita hanya menggunakan 2 node maka edit file di corosync.conf
Cek corosync
[root@host1 ~]# corosync-quorumtool
Quorum information
------------------
Date: Fri Nov 3 15:54:46 2017
Quorum provider: corosync_votequorum
Nodes: 2
Node ID: 2
Ring ID: 1/760
Quorate: Yes
Votequorum information
----------------------
Expected votes: 2
Highest expected: 2
Total votes: 2
Quorum: 1
Flags: 2 Node Quorate WaitForAll
Membership information
----------------------
Nodeid Votes Name
1 1 192.168.100.1
2 1 192.168.100.2 (local)
Backup file corosync
[root@host1 ~]# cp /etc/corosync/corosync.conf /etc/corosync/corosync.WORKING
2. Instalasi Pacemaker
[root@host1 ~]# firewall-cmd --add-port=2224/tcp --permanent
success
[root@host1 ~]# firewall-cmd --reload
success
[root@host1 ~]# yum install pacemaker -y
[root@host1 ~]# systemctl enable pacemaker
Created symlink from /etc/systemd/system/multi-user.target.wants/pacemaker.service to /usr/lib/systemd/system/pacemaker.service.
[root@host1 ~]# yum install pcs
[root@host1 ~]# service pcsd start
[root@host1 ~]# systemctl enable start
3. Setup Cluster
[root@host1 ~]# passwd hacluster
Changing password for user hacluster.
New password:
BAD PASSWORD: The password fails the dictionary check - it is based on a dictionary word
Retype new password:
passwd: all authentication tokens updated successfully.
[root@host1 ~]# pcs cluster auth 192.168.100.1 192.168.100.2
Username: hacluster
Password:
192.168.100.2: Authorized
192.168.100.1: Authorized
[root@host1 ~]# pcs cluster setup --name hacluster 192.168.100.1 192.168.100.2 --force
Destroying cluster on nodes: 192.168.100.1, 192.168.100.2...
192.168.100.1: Stopping Cluster (pacemaker)...
192.168.100.2: Stopping Cluster (pacemaker)...
192.168.100.1: Successfully destroyed cluster
192.168.100.2: Successfully destroyed cluster
Sending 'pacemaker_remote authkey' to '192.168.100.1', '192.168.100.2'
192.168.100.1: successful distribution of the file 'pacemaker_remote authkey'
192.168.100.2: successful distribution of the file 'pacemaker_remote authkey'
Sending cluster config files to the nodes...
192.168.100.1: Succeeded
192.168.100.2: Succeeded
Synchronizing pcsd certificates on nodes 192.168.100.1, 192.168.100.2...
192.168.100.2: Success
192.168.100.1: Success
Restarting pcsd on the nodes in order to reload the certificates...
192.168.100.2: Success
192.168.100.1: Success
--force harus digunakan karena sudah ada file sebelumnya
[root@host1 ~]# pcs cluster start --all
192.168.100.2: Starting Cluster...
192.168.100.1: Starting Cluster...
[root@host1 ~]# pcs cluster status
Cluster Status:
Stack: corosync
Current DC: host2.sample.net (version 1.1.16-12.el7_4.4-94ff4df) - partition with quorum
Last updated: Mon Oct 30 04:35:48 2017
Last change: Mon Oct 30 04:34:49 2017 by hacluster via crmd on host2.sample.net
2 nodes configured
0 resources configured
PCSD Status:
host2.sample.net (192.168.100.2): Online
host1.sample.net (192.168.100.1): Online
Validasi cluster
[root@host1 ~]# crm_verify -L -V
error: unpack_resources: Resource start-up disabled since no STONITH resources have been defined
error: unpack_resources: Either configure some or disable STONITH with the stonith-enabled option
error: unpack_resources: NOTE: Clusters with shared data need STONITH to ensure data integrity
Errors found during check: config not valid
Terdapat error, maka disable stonith
[root@host1 ~]# pcs property set stonith-enabled=false
[root@host1 ~]# crm_verify -L -V
[root@host1 ~]#
Jalankan cluster startup
[root@host1 ~]# systemctl enable pcsd
4. Setup Resource Cluster
- IP Resource
[root@host1 ~]# pcs resource create ClusterIP ocf:heartbeat:IPaddr2 ip=192.168.100.4 cidr_netmask=24 nic=eth0:0 op monitor interval=30s
Sampai sini coba untuk test HA.
Matikan host1. Seharusnya ClusterIP akan berjalan di host2.sample.net.
Lanjutkan..
- Filesystem Resource
[root@host1 ~]# pcs resource create Filesystem Filesystem device="/dev/sdb1" directory="/data" fstype="xfs"
[root@host1 ~]# pcs resource show
ClusterIP (ocf::heartbeat:IPaddr2) : Started host1.sample.net
Filesystem (ocf::heartbeat:Filesystem): Started host1.sample.net
Membuat Resource menjadi 1 location
[root@host1 ~]# pcs constraint colocation add ClusterIP Filesystem
[root@host1 ~]# pcs constraint show
Location Constraints:
Resource: Zimbrasvc
Enabled on: host1 (score:INFINITY)
Enabled on: host1.sample.net (score:INFINITY)
Ordering Constraints:
Colocation Constraints:
ClusterIP with Filesystem (score:INFINITY)
Tips Menghapus node di cluster
Contoh : sebelumnya saya membuat host3
Jalankan di seluruh cluster
1. Hapus node di nodelist corosync.conf
2. Stop Cluster
3. Check cluster
[root@host1 ~]# pcs status
Cluster name: hacluster
WARNING: corosync and pacemaker node names do not match (IPs used in setup?)
Stack: corosync
Current DC: host1.sample.net (version 1.1.16-12.el7_4.4-94ff4df) - partition with quorum
Last updated: Tue Oct 31 00:23:02 2017
Last change: Tue Oct 31 00:06:25 2017 by root via cibadmin on host1.sample.net
3 nodes configured
2 resources configured
Online: [ host1.sample.net host2.sample.net ]
OFFLINE: [ host3.sample.net ]
Full list of resources:
Resource Group: Website
ClusterIP (ocf::heartbeat:IPaddr2): Started host1.sample.net
Webserver (ocf::heartbeat:apache): Started host1.sample.net
Daemon Status:
corosync: active/enabled
pacemaker: active/enabled
pcsd: active/enabled
Terlihatnode host3.sample.net OFFLINE
4. Hapus offline cluster jalankan di cluster host1 dan host2
[root@host1 ~]# cibadmin --delete --xml-text ''
[root@host1 ~]# cibadmin --delete --xml-text ''
Tips Membuat Group Cluster
[root@host1 ~]# pcs resource group add Zimbra ClusterIP Filesystem
[root@host1 opt]# pcs status
Cluster name: hacluster
WARNING: corosync and pacemaker node names do not match (IPs used in setup?)
Stack: corosync
Current DC: host1.sample.net (version 1.1.16-12.el7_4.4-94ff4df) - partition with quorum
Last updated: Fri Nov 3 17:54:28 2017
Last change: Fri Nov 3 17:54:27 2017 by root via cibadmin on host1.sample.net
2 nodes configured
3 resources configured
Online: [ host1.sample.net host2.sample.net ]
Full list of resources:
Resource Group: Zimbra
ClusterIP (ocf::heartbeat:IPaddr2): Started host1.sample.net
Filesystem (ocf::heartbeat:Filesystem): Started host1.sample.net
Daemon Status:
corosync: active/enabled
pacemaker: active/enabled
pcsd: active/enabled
Tips Menghapus Resource
[root@host1 ~]# pcs resource deleteClusterIP
ZIMBRA
Zimbra yang kita gunakan versi zcs-8.8.3_GA_1872.RHEL7_64
Install Zimbra di Host 1
Beberapa hal yang perlu dipastikan yaitu :
- DNS harus aktif
- Cluster berjalan di host1.sample.net
- Ping mail.sample.net harus aktif dan berjalan di Virtual IP host1
- dig mx sample.net harus mengacu ke mail.sample.net
- nslookup mail.sample.net mengacu ke 192.168.100.3
- Di host1 open firewall, masukkan perintah di bawah :
firewall-cmd --permanent --add-service=https
firewall-cmd --permanent --add-service=http
firewall-cmd --permanent --add-service=ldap
firewall-cmd --permanent --add-port=22/tcp
firewall-cmd --permanent --add-port=25/tcp
firewall-cmd --permanent --add-port=110/tcp
firewall-cmd --permanent --add-port=143/tcp
firewall-cmd --permanent --add-port=993/tcp
firewall-cmd --permanent --add-port=995/tcp
firewall-cmd --permanent --add-port=7025/tcp
firewall-cmd --permanent --add-port=7071/tcp
firewall-cmd --permanent --add-port=587/tcp
firewall-cmd --permanent --add-port=465/tcp
Download Zimbra Open Source Edition di situs Zimbra untuk Centos 7.
Misal file di simpan di /root.
Extrak file tarball
[root@host1 ~]# tar -xzvf zcs-8.8.3_GA_1872.RHEL7_64.20170905143325.tgz
[root@host1 ~]# cd zcs-8.8.3_GA_1872.RHEL7_64.20170905143325
[root@host1 zcs-8.8.3_GA_1872.RHEL7_64.20170905143325]#./install.sh
Zimbra Instalation Package
Zimbra-ldap
Zimbra-logger
Zimbra-mta
Zimbra-snmp
Zimbra-store
Zimbra-apache
Zimbra-spell
Zimbra-memcached
Zimbra-proxy
DNS hostname = mail.sample.net
Domain name = sample.net
- Test Zimbra
- Matikan service Zimbra
[root@host1 ~]# su zimbra
[zimbra@host1 root]$ zmcontrol stop
Lanjutkan instalasi zimbra di host2 seperti cara diatas dan matikan service zimbra
Kembali ke host1 (hanya di salah satu host)
- Setelah instalasi selesai, copy file zimbra /opt/zimbra ke Disk Storage /data.
- Pastikan folder /data sudah mengacu ke disk /dev/sdb1
- Copy file zimbra kecuali data.mdb menggunakan rsync
[root@host1 ~]# rsync -avP --exclude=data.mdb /opt/zimbr /data/
File data.mdb ukuran file adalah 80GB, dan realnya hanya 1 MB (zimbra fresh).
Jika menggunakan perintah rsync maka bisa menghasilkan space 80GB pula.
- Copy file data.mdb menggunakan cp
[root@host1 ~]# cp -ap /opt/zimbra/data/ldap/mdb/db/data.mdb /data/zimbra.old/data/ldap/mdb/db/
- Rename folde /opt/zimbra
[root@host1 ~]# mv /opt/zimbra /opt/zimbra.old
- Buat Link zimbra folder dari folder /data/zimbra ke /opt/zimbra
[root@host1 ~]# ln -s /data/zimbra /opt/zimbra
- Coba test jalankan Zimbra kembali
Resource Zimbra
- Stop service Zimbra kembali. Dan buat file untuk resource cluster service Zimbra
- Buat script zimbractl
[root@host1 ~]# vi /usr/lib/ocf/resource.d/heartbeat/zimbractl
#!/bin/sh
#
# Resource script for Zimbra
#
# Description: Manages Zimbra as an OCF resource in
# an high-availability setup.
#
# Author: RRMP
# License: GNU General Public License (GPL)
#
#
# usage: $0 {start|stop|reload|monitor|validate-all|meta-data}
#
# The "start" arg starts a Zimbra instance
#
# The "stop" arg stops it.
#
# OCF parameters:
# OCF_RESKEY_binary
# OCF_RESKEY_config_dir
# OCF_RESKEY_parameters
#
##########################################################################
# Initialization:
: ${OCF_FUNCTIONS_DIR=${OCF_ROOT}/lib/heartbeat}
. ${OCF_FUNCTIONS_DIR}/ocf-shellfuncs
: ${OCF_RESKEY_binary="zmcontrol"}
: ${OCF_RESKEY_zimbra_dir="/opt/zimbra"}
: ${OCF_RESKEY_zimbra_user="zimbra"}
: ${OCF_RESKEY_zimbra_group="zimbra"}
USAGE="Usage: $0 {start|stop|reload|status|monitor|validate-all|meta-data}";
##########################################################################
usage() {
echo $USAGE >&2
}
meta_data() {
cat <
This script manages Zimbra as an OCF resource in a high-availability setup.
Short name to the Zimbra control script.
For example, "zmcontrol" of "/etc/init.d/zimbra".
Short name to the Zimbra control script
Full path to Zimbra directory.
For example, "/opt/zimbra".
Full path to Zimbra directory
Zimbra username.
For example, "zimbra".
unique="1" required="0">
Zimbra group.
For example, "zimbra".
interval="60s" />
END
}
case $1 in
meta-data)
meta_data
exit $OCF_SUCCESS
;;
usage|help)
usage
exit $OCF_SUCCESS
;;
start)
echo "Starting Zimbra Services"
echo "0" > /var/log/db-svc-started.log
rm -f /var/log/zimbra-svc-stopped.log
if [ -f /etc/init.d/zimbra ]
then
/etc/init.d/zimbra start
fi
ocf_log info "Zimbra started."
exit $OCF_SUCCESS
;;
stop)
echo "Stopping Zimbra Services"
rm -f /var/log/db-svc-started.log
echo "0" > /var/log/zimbra-svc-stopped.log
if [ -f /etc/init.d/zimbra ]
then
/etc/init.d/zimbra stop
/bin/killall -9 -u zimbra
fi
ocf_log info "Zimbra stopped."
exit $OCF_SUCCESS
;;
status|monitor)
echo "Zimbra Services Status"
if [ -f /var/log/zimbra-svc-started.log ]
then
exit $OCF_SUCCESS
else
exit $OCF_NOT_RUNNING
fi
;;
restart|reload)
echo "Zimbra Services Restart"
ocf_log info "Reloading Zimbra."
if [ -f /etc/init.d/zimbra ]
then
/etc/init.d/zimbra stop
/bin/killall -9 -u zimbra
/etc/init.d/zimbra start
fi
exit $OCF_SUCCESS
;;
validate-all)
echo "Validating Zimbra"
exit $OCF_SUCCESS
;;
*)
usage
exit $OCF_ERR_UNIMPLEMENTED
;;
esac
Buat Resource dengan nama Zimbrasvc
[root@host1 ~]# pcs resource create Zimbrasvc ocf:heartbeat:zimbractl
[root@host1 ~]# pcs resource show
Resource Group: Zimbra
ClusterIP (ocf::heartbeat:IPaddr2): Started host1.sample.net
Filesystem (ocf::heartbeat:Filesystem): Started host1.sample.net
Zimbrasvc (ocf::heartbeat:zimbractl): Started host1.sample.net
Test kembali apakah zimbra berjalan lancar
Jika terdapat error pastikan :
1. Mapping drive /data sudah ke /dev/sdb1 (storage iscsi di freenas)
2. Virtual IP sudah terkoneksi
3. Cluster service berjalan di kedua host
Tips PENTING setelah ZImbra aktif
1. Sebelum mengcopy file /opt/zimbra ke folder lain (/zimbra) pastikan zimbra sudah off
2. Service Zimbra dimatikan di startup, karena service akan dilayani oleh pcs
Catatan : Resource Cluster yang berkaitan dengan service dinonaktifkan untuk otomatis startup di OS nya.
Jadi service akan dikelola/dijalankan oleh pacemaker.
Cek Cluster status
[root@host1 ~]# pcs status
Cluster name: hacluster
WARNING: corosync and pacemaker node names do not match (IPs used in setup?)
Stack: corosync
Current DC: host2.sample.net (version 1.1.16-12.el7_4.4-94ff4df) - partition with quorum
Last updated: Tue Nov 7 12:27:24 2017
Last change: Mon Nov 6 21:08:47 2017 by root via cibadmin on host1.sample.net
2 nodes configured
3 resources configured
Online: [ host1.sample.net host2.sample.net ]
Full list of resources:
Resource Group: Zimbra
ClusterIP (ocf::heartbeat:IPaddr2): Started host1.sample.net
Filesystem (ocf::heartbeat:Filesystem): Started host1.sample.net
Zimbrasvc (ocf::heartbeat:zimbractl): Started host1.sample.net
Daemon Status:
corosync: active/enabled
pacemaker: active/enabled
pcsd: inactive/enabled
[root@host1 ~]#
Test matikan pcs di host1, seharusnya akan berpindah ke host2
[root@host1 ~]# pcs cluster stop
Stopping Cluster (pacemaker)...
Stopping Cluster (corosync)...
Pindah ke host2
[root@host2 ~]# pcs status
Cluster name: hacluster
WARNING: corosync and pacemaker node names do not match (IPs used in setup?)
Stack: corosync
Current DC: host2.sample.net (version 1.1.16-12.el7_4.4-94ff4df) - partition with quorum
Last updated: Tue Nov 7 12:30:31 2017
Last change: Mon Nov 6 21:08:47 2017 by root via cibadmin on host1.sample.net
2 nodes configured
3 resources configured
Online: [ host2.sample.net ]
OFFLINE: [ host1.sample.net ]
Full list of resources:
Resource Group: Zimbra
ClusterIP (ocf::heartbeat:IPaddr2): Started host2.sample.net
Filesystem (ocf::heartbeat:Filesystem): Started host2.sample.net
Zimbrasvc (ocf::heartbeat:zimbractl): Stopped
Daemon Status:
corosync: active/enabled
pacemaker: active/enabled
pcsd: active/enabled
[root@host2 ~]#
Jika dilihat zimbrasvc masih stop statusnya, jangan khawatir service zimbra lumayan memakan waktu agar service running semua.
Bisa dicek di
[root@host2 ~]# su zimbra
[zimbra@host2 root]$ zmcontrol status
Cek juga di log apakah ada yang failed
[root@host2 ~]# tail -f /var/log/zimbra.log
Cek kembali cluster status
[root@host2 ~]# pcs status
Cluster name: hacluster
WARNING: corosync and pacemaker node names do not match (IPs used in setup?)
Stack: corosync
Current DC: host2.sample.net (version 1.1.16-12.el7_4.4-94ff4df) - partition with quorum
Last updated: Tue Nov 7 12:35:12 2017
Last change: Mon Nov 6 21:08:47 2017 by root via cibadmin on host1.sample.net
2 nodes configured
3 resources configured
Online: [ host2.sample.net ]
OFFLINE: [ host1.sample.net ]
Full list of resources:
Resource Group: Zimbra
ClusterIP (ocf::heartbeat:IPaddr2): Started host2.sample.net
Filesystem (ocf::heartbeat:Filesystem): Started host2.sample.net
Zimbrasvc (ocf::heartbeat:zimbractl): Started host2.sample.net
Daemon Status:
corosync: active/enabled
pacemaker: active/enabled
pcsd: active/enabled
Jalankan kembali seluruh cluster
[root@host1 ~]# pcs cluster start
Starting Cluster...
Biasanya host2 akan tetap aktif Started host2.sample.net
Untuk kelanjutannya bisa simak dibawah.
Finally Resource PCS
1. Membuat resource menjadi 1 lokasi (colocation)
[root@host1 ~]# pcs constraint colocation add ClusterIP Filesystem Zimbrasvc
Sebelum disetting colocation, biasanya antar Resource berbeda running di host yang ada. Misal Cluster IP di host1, sedangkan Filesystem di host2
2. Membuat resource menjadi 1 group dengan nama group Zimbra
[root@host1 ~]# pcs resource group add Zimbra ClusterIP Filesystem Zimbrasvc
3. Membuat default resource berjalan di host1 (location)
[root@host1 ~]# pcs constraint location Zimbra host1.sample.net=50
Secara default service akan berjalan di host1. Jika host1 down, maka host2 aktif. Dan bilamana host1 aktif kembali, maka cluster aktif akan pindah kembali ke host1. Angka 50 merupakan angka bebas
Coba test kembali stop cluster di host1. Seharusnya cluster aktif pindah ke host2.
SELESAI


